DRYWALL REPAIR SERVICE DENVER
Drywall Repair in Denver, Colorado
When the Walls Talk: Stories from Denver Homes
A while back, I got a call from a woman in Park Hill whose toddler had accidentally rammed a ride-on toy straight through the hallway drywall. “It looks like he tried to drive to the neighbors,” she joked. It’s one of dozens of calls I get each month across Denver—from Cheesman Park condos to Highland bungalows. Drywall damage happens, and when it does, it feels urgent.
Drywall repair might sound like a simple fix, but getting it done right makes all the difference in how your home looks—and how it holds up. That’s why our Denver drywall repair team is all about doing clean, long-lasting work that fits your home and your budget.
Why Drywall Repair Matters More Than You Think
Cracks, holes, bubbling tape seams—small issues like these often lead to bigger problems if ignored. Denver’s dry climate and the constant heating/cooling cycles from our seasons can cause drywall to shift, pop screws, or show stress cracks around windows and doors. Not to mention, foundation settling is a big deal in older neighborhoods like Congress Park or Capitol Hill.
Whether you’re repairing damage from a plumbing leak in your Wash Park basement, or updating the walls in a converted garage in Baker, knowing what’s behind the wall matters. We’ve seen it all—electrical wires that shouldn’t be there, or mold from years of unnoticed water seepage.
What We Offer: Drywall Repair Services Tailored for Denver Homes
Small Patch Repair
From doorknob-sized dents to fist-sized holes, we’ve got fast, clean solutions. We’ll match the existing wall texture so it looks like nothing ever happened.
Water Damage and Mold Remediation
In areas like Sloan’s Lake or Five Points, where older homes are common, we often see moisture damage in basements and kitchens. We remove the damaged sections, treat the area, and rehang drywall with mold-resistant board.
Ceiling Repair
Ever had a roof leak or old popcorn ceiling that needed to go? We patch ceilings, blend finishes, and give your space a fresh, smooth look.
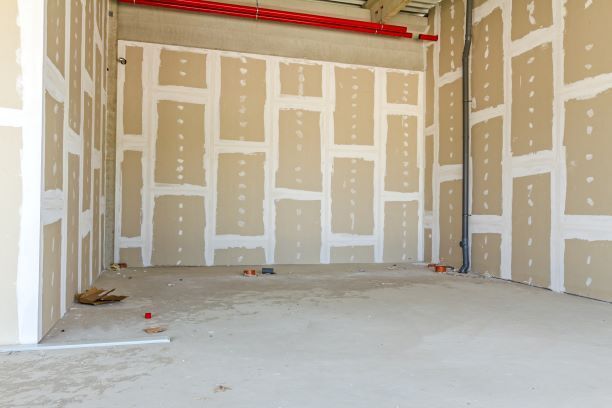
Full Room and Sheet Installations
For bigger remodels, like a basement finishing project in Stapleton (now Central Park), we handle the full install: hanging, taping, mudding, sanding, and priming.
Local Materials, Local Knowledge
We source our drywall from local suppliers like Interstate Roofing & Supply, who understand Colorado-specific code and climate conditions. That includes using Type X fire-resistant drywall for code compliance in garages, or moisture-resistant green board for bathrooms.
How We Do It: Our Approach to Drywall Repair
1. Inspection
We start by visiting your property and checking the scope of the issue. For example, cracks in a ceiling in LoDo might be cosmetic—or a sign of structural movement.
2. Cut and Secure
We carefully cut out damaged sections (no jagged holes here) and install new backing if needed. For ceiling repairs, we use panel lifts so the boards are set flush and secure.
3. Tape and Mud
We apply joint tape with setting compound, then follow up with additional coats, sanding in between to get that clean, paint-ready finish.
4. Texture and Primer
Denver homes have all kinds of textures—knockdown, orange peel, smooth. We’ll match your current wall finish exactly. Then we seal the surface with primer so it’s ready to paint.
Real Questions from Real Denver Homeowners
"Do I need to replace the whole wall if there’s a hole?"
Not usually. If the damage is contained, we can replace just the section. Full replacement usually only happens in cases of water or mold damage.
"How long does drywall repair take?"
Most small repairs can be finished in one day. Larger repairs (like ceiling patches or multi-wall fixes) usually take 2–3 days including drying time between mudding coats.
"Can you match my wall texture?"
Absolutely. Whether it’s a vintage swirl pattern in Park Hill or knockdown in a new-build near RiNo, we’ll get it right.
Drywall and the Denver Climate: What You Should Know
Drywall expansion and contraction happen more here than in more humid regions. If your home has hairline cracks near the ceiling, especially near windows, that’s often from temperature swings. We use flexible, high-quality joint compounds to reduce future cracking.
Look for Drywall Repair Around These Local Events
During spring hail season (yep, we all dread it), we often see calls increase from homes with water leaks that show up as stained drywall. After Denver’s 2023 hailstorm, we helped dozens of families in Green Valley Ranch repair ceiling damage from roof leaks.
Another spike happens in the fall, when families get ready to list homes before the holidays. A quick drywall repair before staging makes a world of difference when you're trying to sell.
Final Thoughts: Your Denver Drywall Experts
We live here, too. We understand the quirks of Denver homes—from the old lath-and-plaster walls in Berkeley to the newer drywall in Cherry Creek townhomes. Whether it’s a fresh install, patch repair, or full-room renovation, our drywall services are tailored to the way Denver homes live and breathe.
Give us a call if you’re noticing a new crack, stain, or hole. We'll stop by, talk you through the options, and get your space looking right again.
Helpful Links
- Denver Building Code for Residential Repairs
- How to Identify Mold Behind Drywall (CDC Guide)
- Interstate Roofing & Supply – Local Supplier

* Indicates required field